Wednesday 29 March 2017
Sunday 26 March 2017
Friday 3 February 2017
ADDING CUSTOMER GROUPS IN MAGENTO-1
Adding Customer Groups
In this guide we show you how you can quickly add Customer Groups into your Magento account to make tracking and managing customer data a whole lot easier.
In Magento we can create Customer Groups where we can assign the orders from the different marketplaces so that we can keep eBay orders together and separated from Amazon or Play orders for example. A note here is if you don’t envisage you ever selling on Amazon or Play, then you have no need to add these additional groups.
How to Add Customer Groups
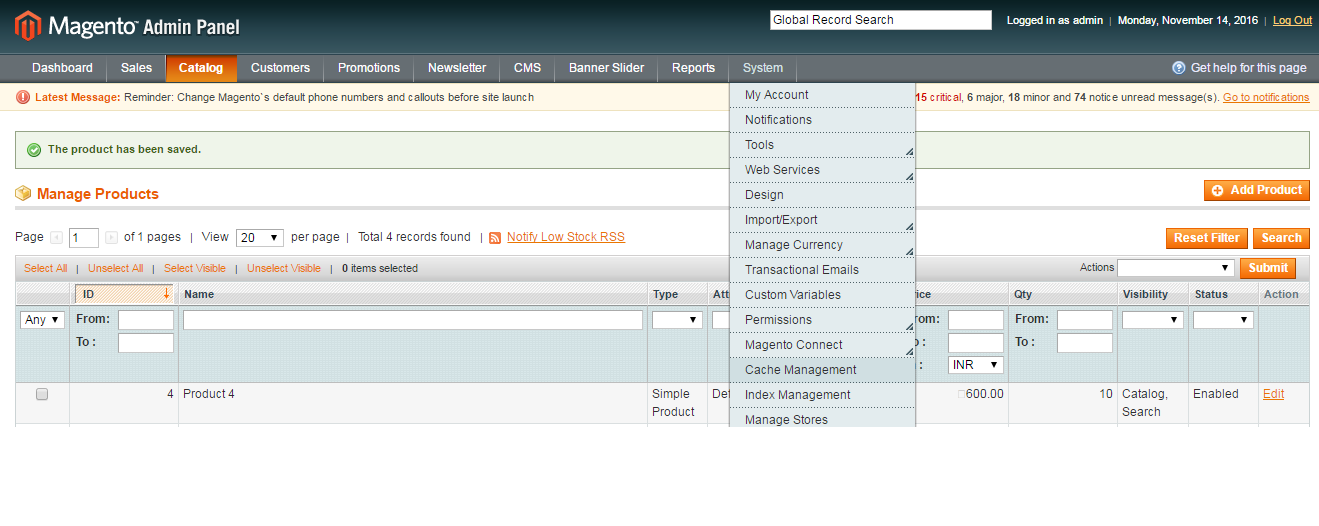
So in our Magento system we need to go to the menu ‘Customers’ –> ‘Customer Groups’ From this page we can click the ‘Add New Customer Group’ Button in the top right hand corner. On this page we just need to set the group name and the Tax Class. So in our example we name the first group ‘eBay’ and leave the tax class set to ‘Retail Customer’ Then we click ‘Save Customer Group’ in the top right hand corner. We then do the same for Amazon, Play and Rakutan.
Now we have set these up, in the later guides with M2E Pro they will come in to play for managing orders from the different marketplaces.
In the next guide we are going to look at Attribute and Attribute Sets.
How to Add Customer Groups to Magento
If you’re looking at installing M2E Pro on your Magento system, and selling on different marketplaces, adding customer groups is the best way to go about it.
Creating customer groups in your system shall make it easier for you to assign and manage orders from different marketplaces.
This guide will show you step-by-step how to add customer groups for eBay and other marketplaces where you intend to sell on.
Step 1. Go to Customer Groups


Click on the Add New Customer Group button at the top right-hand corner.
Step 2. Fill in the Fields in the New Customer Group Section

Type eBay in the Group Name field, set the Tax Class option to Retail Customer, and then click on the Save Customer Group button at the top right of your screen

Step 3. Add Additional Customer Groups

If you intend to sell on other marketplaces besides eBay, click on the Add New Customer Group button again.
Fill in the Group Name field with Amazon, set Tax Class to Retail Customer, then save this data by clicking on the Save Customer Group button in the upper right-hand corner.
Repeat this step to create additional customer groups.
Step 4. View the List of Your Customer Groups

Tuesday 10 January 2017
Magento Theme development guide part 2(Magento Themeing)
Magento Hierarchy
First up, we need to understand the Magento Hierarchy and where our theme falls into place. There are hundreds of folders and thousands of files, far too many to list, I will only be focusing on the ones we need to work with.
- app/design/frontend/base/default/
- app/design/frontend/default/default/
- app/design/frontend/<package_name>/<theme_name>/
- skin/frontend/base/default/
- skin/frontend/default/default/
- skin/frontend/<package_name>/<theme_name>/
Magento, at its core, has two folders
app and skin which correspond with each other. The app directory contains files that control how the page templates are rendered, the structure. The skin directory contains files that control the appearance of the website such as CSS, JavaScript, and images.
Within a sub-folder of
app and skin are where our packages and themes can be found, a typical install of Magento comes with two packages base and default.
So, before we go any further it's important we understand what packages and themes are. If we get this right everything else will fall into place nicely.
All About Packages and Themes
A package is a collection of related themes, there's no limitation on how many packages we can have and we must have at least one package present. Magento comes with a special package, if you will, called
base. It's a repository for making Magento core files available to the front end. You must never edit the base package files, do so at your own risk - more on this later!
A theme on the other hand is a direct sub-folder of a package which contains the files that make up your store, again there's no limitation on how many themes we can have within a package. A theme can only belong to one package and by convention each package must contain a theme named "default" which is the main theme for that package.
What's Base All About?
The
base package only contains one theme named default. It comes bundled with every Magento install and contains the front end files that make our store run. There's a couple of rules we must accept with the base package.
The first rule being as I mentioned earlier is not to edit these files, this means both in
app/design/frontend/base/ and skin/frontend/base/ they should only be used for reference. Files that need to be edited should be copied from base to your package/theme. There are a couple of reasons for this which I will explain.
These files are what make Magento core files in
app/code/core/ available to the front end. We simply shouldn't be editing core files, this theory doesn't just apply on Magento but also applies on other platforms including WordPress.
The second one being that when you upgrade Magento it will likely overwrite the
base package files. So all your hard work and edits to getting your website looking tip top will all be gone. Unless you took a backup you've pretty much had it!
The second rule is the files in the
base package are part of the fall back system, which I will explain next. In short, Magento will fall back on the core files found in base after it utilizes your package and theme. When it falls back it should be to the original intact file not an edited version.
The third rule is do not create any themes inside of the
base package.
In summary, only use
base for reference and if you need to edit a file copy it over to your own package/theme. If you do ever need to edit base do so at your own risk and keep track of your changes as you may need to manually restore them after upgrades, otherwise leave it well alone!What's Default All About?
The
default package again comes bundled with every Magento install but this time has multiple themes assigned to it. As of community edition 1.8.1.0 it has four different themes of which are:- default
- blank
- iphone
- modern
Just like the
base package the exact same rules apply here. The themes in the default package are in essence purely for demonstration purposes only. Ideal for demo stores or if you want to showcase what Magento is capable of to your clients, its a quick setup.Fallback Logic
Magento relies on a fallback logic to make themes easier to maintain and more upgrade friendly. It allows us to edit and maintain only the files we need within our theme. If we don't need to edit the file we don't need it in our theme, the file will be picked up from elsewhere. To explain this in detail we need a real life example.
Say we have our own website which is setup to use our own package and theme like so:
- app/design/frontend/our_package/our_theme/
- skin/frontend/our_package/our_theme/
Our website requests a template file named
1column.phtml and a CSS file named styles.css but Magento is unable to locate these files within our theme. Magento fallback logic will now search the next theme in the hierarchy for the files and continue searching until it locates the requested files.
The following order demonstrates the fallback logic Magento goes through when looking for our files:
- app/design/frontend/our_package/our_theme/template/page/1column.phtml
- app/design/frontend/our_package/default/template/page/1column.phtml
- app/design/frontend/base/default/template/page/1column.phtml
- skin/frontend/our_package/our_theme/css/styles.css
- skin/frontend/our_package/default/css/style
- skin/frontend/base/default/css/styles.css
With this fallback logic in place it means we can have a clean code base by keeping our themes to the bare minimum. Only copy the files from base that we need to make modifications to otherwise leave the files out of our theme. If our website requests the file and we don't have it in our theme it will be located by going through the above logic.
Note: If after Magento has been through the fallback logic and the file still cannot be found it will either throw a rendering error if it's in the app directory or if its in the skin directory it will likely throw a 404 file not found.
Create and Enable Our Package / Theme
Right, enough talk let's get down to setting it up.
First up we will create our very our package/theme setup. We'll start by creating the following folders:
- app/design/frontend/jasonalvis/default/
- skin/frontend/jasonalvis/default/
Now we have a package called
jasonalvis and a theme called default, feel free to rename your package to suit your needs. We will keep the theme name as default as each package should always have a default theme, remembering also that default is automatically part of the fallback logic.
All that's left to do now is to enable the package via the Magento admin area. Once logged in head over to system > configuration. From here click on design from the left hand menu and then enter your package name in the Current Package Name field.

While we are here notice below there is a themes section. This is where we would enter our theme name, but because we're just using default we don't need to type anything in here as Magento automatically seeks out this name.
For demonstration purposes say we had for example a theme we wanted to use during a sale we would create the theme like so:
- app/design/frontend/jasonalvis/sale/
- skin/frontend/jasonalvis/sale/

When to Use a Package or a Theme?
So now you know how to setup your package/theme but whats best for which scenario?
Well there are countless scenarios out there and I'm sure each and every one of you have a different one. It also gets a bit more complicated when you have a Magento installation with a multi-store setup. As a general rule the themes the package contains should be similar, otherwise they should be split out into packages.
The
default theme should be the site hub and the additional themes should simply be adjustments to the hub. If your drastically changing every aspect of the site in a theme it probably warrants it to be in a separate package entirely.
Note: When creating additional themes within our package we don't have to create it in both the app and skin directories, only create the theme where it's relevant. Take for example our sale theme, it's only going to be styling changes, different color scheme etc the actual templating files are not being changed. Therefore only create the theme in the skin directory and edit the relevant files as required.
With that said, let's call it a day. You should now have a solid understanding on the Magento hierarchy which you'll need to put into use through the rest of the series. As always any questions leave a message in the comments below.
Click Here If you want to join Magento Training in Delhi
Click Here If you want to join Magento Training in Delhi
Thursday 17 November 2016
Magento Theme Development Guide Part 1(Magento Theming)
Note : Before reach this article please read my previous article
Magento Directory Structure

Magento Directory Structure
Magento Theme Development Guide :-
Magento theme development is very importanat part of magento project development. If you want to implement your own custom design for your store you have to knowledge about magento theme development if you are not able to implement your own design please read this series of articles..
Before working on magento coding part disable your magento cache from admin panel.
- Login to dashboard
- Go to configuration (System->Cache Management)
- Select All
- From Right Side (Select Disable from right side dropdown option)
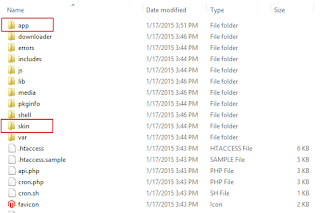
Magento Directory where your theme located :-
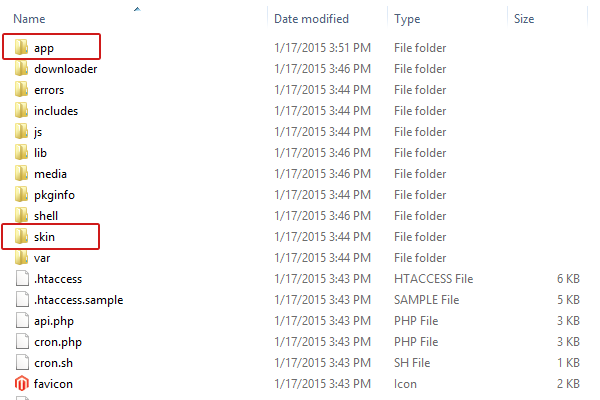
- When you open your Magento root folder, you’ll see a list of folders under there. Out of these folders, the folders in which we’ll be editing files are just the app folder and the skin folder.
- Templating files in the app/design/frontend/<designPackageName>/<<themeName>
/directory are organized into the following subdirectories
Template—Contains the PHTML files that contain xHTML markups and any necessary PHP to create
logic for visual presentation. Some templates are page templates and some are block templates.
Locale—Contains simple CSV text documents organized on a per language basis containing
translation strings (as name-value pairs) for all text produced by Magento (e.g., for interface
elements and messages, not products and categories)
- Skin files in the skin/frontend/<designPackageName>/<<themeName>
Images—Contains all images used by the theme
JS—Contains theme-specific JavaScript routines and callable functions. (Most JavaScript libraries, which might be shared across themes) are placed in the js/ directory at the Magento root
Click Here If you want to join Magento Training in Delhi
continued next tutorial......
JS—Contains theme-specific JavaScript routines and callable functions. (Most JavaScript libraries, which might be shared across themes) are placed in the js/ directory at the Magento root
Click Here If you want to join Magento Training in Delhi
continued next tutorial......
Monday 7 November 2016
Magento2 Directory Structure
I have gone through the directories of Magento2 and i and i found that directory structure changed . It is important to understand differences between Magento1.x and Magento2. In tis blog we will discuss about Magento2 Directory and Files structures.


Root Folder Structure
First let’s compare root folder structure of Magento 1.x and Magento 2. There are major changes applied at root level. Very first thing you will identify is that some new folders are introduced and some of them are removed.
- media and errors folder are moved to pub folder
- skin and js folder are moved to pub/static folder. Now it is easy to maintain static content via CDN.
- js, css, images are again divided into pub/static/adminhtml and pub/static/frontend for backend and frontend area respectively.
- dev folder contains various tools for developers such as migration tools and tests. shell is moved to dev folder
- downloader, includes and pkginfo folder are no more with magento 2.
- setup directory is for installation process
- get.php, cron.php and index.php files are moved to pub folder.

There are 2 index.php files one in Magento root folder and another in pub folder. You can configure your server to run your application through any of this index.php file. Using pub/index.php is a good option as it will stop access of application files and it is good for security.
eav.php
Database connection settings, backend name, session save settings and cache settings are declared in app/etc/env.php
config.php
config.php has list of active and inactive modules
Theme Folder Structure
Magento 2 comes with very drastic changes on the frontend. Significant changes has been apply on theme structure for performance improvements.
As like earlier version magento 1.x base package ‘app/design/frontend/base/’ will no more exists. Each core module in Magento 2 has new folder introduced which is called ‘view’. This ‘view’ folder contains all module specific files like email template, js, layout xmls, phtml for frontend and backend.
Themes are grouped by ‘vendor’ which we known as ‘package’ in magento 1.x. Theme structure in Magento 2 is like ‘app/design/frontend/vendor_name/theme_name’.

Core Module
Magento core components are exists in your_magento_web_root/vendor/magento directory.
Module Folder Structure
In Magento 2 app/etc/modules folder is removed and module’s declaration is moved to app/code/Vendor_name/Module_name/etc/module.xml file. Each module has its own registration.php file in its root. This file is for Magento to identify it as a module.
app/code/core, /local, /community folders are removed and module structure becomes like
[root]/app/code/[Namespace]/[Module]
[root]/app/code/[Namespace]/[Module]
- Namespace is a name of a module’s vendor
- Module is a name assigned to a module by its vendor
Next to Controller, Model, Helper, Block, etc Magento 2 has introduced new folders which are:
- Api
- i18n – contains module specific translation
- view – contains module specific layout xmls, phtml

Click Here If you want to join Magento Training in Delhi
Thursday 3 November 2016
Magento Theme installation Guide
Steps for magento theme installation Guide
You can install mageto themes two types.
Note : Before installing any theme or extension please disable cache from your magento admin panel.
To install a theme from Magento Connect you need to follow certain steps which are explained below (Advance users may skip few steps):
1. Select the theme by browsing the huge Magento theme archive. OR, If you know the direct URL of your favourite theme just open it’s Magento connect URL
2. Now, you will see a button right under the theme image called “Get Extension Key”. You need to click “Get Extension Key” and agree to extension license agreement.
Url for free theme : https://www.magentocommerce.com/magento-connect/hellowired-free-theme-1.html
Login to your magento account.

3. After you select agree checkbox and click “Get Extension Key” you will see the Magento extension key right there itself (displayed in the box). You need to paste this extension key in your store’s Magento connect tab. Keep it safe.
4. Copy this Magento extension key. E.g. It will look like “magento-community/Magik_Autocomplete”
5. In order to install this theme into your Magento store you need to login to your store admin panel and go to System->Magento Connect->Magento Connect Manager. Magento connect manager will ask you to login again. You need to use your store admin login credentials to get past the login screen.

You need to paste the theme extension key copied from the Magentocommerce.com’s Magento connect here.
Magento connect checks for the extension key validity and downloads the theme on your system. Depending upon your internet connection speed (bandwidth) and theme size it will take time to install. These extension keys are specifically created with a unique combination so that there is no confusion over which extension to download. If you have correct extension key and there are no errors in theme or your internet bandwidth you will not see any error messages. In case there are any error messages try downloading and installing again. If you do not succed at all then you can contact the theme owner or ask questions in the theme documentation tab.
6. Soon after you see “Theme successfully installed” message go to System->Configuration->Design->Themes and provide the theme name in Default field (which will change your default theme to this new theme) and click “Save Config” button at the top right corner of your screen.

7. A Magento theme revolves around different columns in your theme layout. In case your store home page doesn’t load properly and shows weird design then go to CMS->Manage Pages. You will notice that there are two different layouts for the home page (may be more depending upon how many themes you have tried in the past). Based on your new theme layout disable all the other home page layouts. You can easily disable/enable the layouts by clicking “Enabled” or “Disabled” links provided in the status field.
By Magento Connect Manager
Login to your magento admin panel
1.Go to system ->Magento Connect->Magento Connect Manager

2. Click On Magento Connect Manager ( Get Login Window again)

3. Login to your admin panel username and password
4. After Login you get dashboard Like this

Subscribe to:
Posts (Atom)